


Introduction
This guide will walk you through installing Ubuntu on Windows using WSL, setting up Python and the Strands SDK, and creating powerful AI agents. We’ll also build a multi-agent collaboration system using the Strands SDK, where agents generate, critique, and improve startup ideas.
Let’s get started!
⚙️ Step 1: After Installing Ubuntu Run It (WSL)
- Open PowerShell as Administrator
- Check installed WSL distros:
wsl –list –verbose - You’ll see something like:
NAME STATE VERSION
* Ubuntu Running 2
Or
NAME STATE VERSION
* UbuntuApp Stopped 2
Note the exact name listed under NAME. (e.g., Ubuntu, UbuntuApp)
- Launch Ubuntu:
wsl -d Ubuntu - You’ll land in a shell like:
root@DESKTOP-XXXX:/#
👤 Step 2: Create Your Unix User (If Prompted)
When Ubuntu starts:
- Enter username (e.g., rudra)
- Enter password (e.g., 123456)
- Press Enter to skip full name, etc.
You’ll now land in:
rudra@DESKTOP-XXXX:~$

🐍 Step 3: Install Python and Pip
Run the following:
sudo apt install -y python3 python3-pip python3-venv
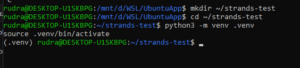
📁 Step 4: Create Project Folder and Virtual Environment
mkdir ~/strands-test
cd ~/strands-test
python3 -m venv .venv
source .venv/bin/activate
You should now see:
(.venv) rudra@DESKTOP-XXXX:~/strands-test$
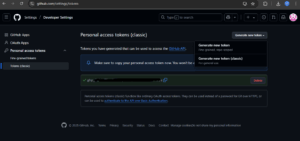
🔐 Step 5: Generate GitHub Token
- Go to: https://github.com/settings/tokens
- Click: Generate new token (classic)
- Select scopes:
- ✅ read: packages
- ✅ read: user
- Copy the token (starts with ghp_…)
- Set the token in the terminal:
export GITHUB_TOKEN=ghp_your_token_here
📦 Step 6: Install Strands SDK
Install the packages:
pip install strands-agents strands-agents-tools strands-agents-builder
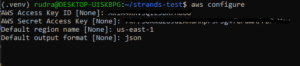
🌩️ Step 7: Install AWS CLI and Configure
- pip install awscli
- aws configure
You’ll be asked to enter:
- AWS Access Key ID
- AWS Secret Access Key
- Region name (e.g., us-east-1)
- Output format (you can leave it empty or type json)
✅ Make sure you have access to AWS Bedrock with Claude 3.5 or 3.7 Sonnet models.
🛠️ Fix Build Errors (If Any): Use Python 3.10
If you see errors like
Note: This error originates from a subprocess, and is likely not a problem with pip. ERROR: Failed building wheel for strands. Failed to build strands
ERROR: Could not build wheels for strands, which is required to install pyproject. toml-based projects
✅ ✅ Best Fix (Recommended): Use Python 3.10sudo add-apt-repository ppa:deadsnakes/ppa -y
sudo apt update
sudo apt install -y python3.10 python3.10-venv python3.10-dev
Recreate environment:
cd ~/strands-test
python3.10 -m venv my-agent-env
source my-agent-env/bin/activate
Then reinstall:
pip install –upgrade pip setuptools
pip install strands-agents strands-agents-tools
🤖 Step 8: Create Your First Agent (agent.py)
Create the file:
nano agent.py
Paste the following code:
from strands import Agent
agent = Agent(
system_prompt=“You are a creative assistant who helps users write taglines for new startups.”
)
response = agent(“Suggest a tagline for a food delivery app.”)
print(“Agent 1:”, response)
Save and Exit Nano
- Press Alt + O, then Enter to save
- Press Alt + X to exit
Then run it:
python agent.py
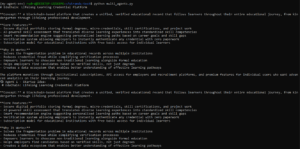
Result
🤝 Step 9: Create Multi-Agent Collaboration (multi_agents.py)
🎯 Goal Recap:
- Agent 1: Generates a startup idea
- Agent 2: Critiques it
- Agent 3: Improves it based on the critique
Create the file:
nano multi_agents.py
Paste the following Python code:
from strands import Agent
# Agent 1: Idea generator
agent1 = Agent(
system_prompt=“You are a startup idea generator. Be creative, practical, and inspiring.”
)
# Agent 2: Critic
agent2 = Agent(
system_prompt=“You are a seasoned venture capitalist. Your job is to critique startup ideas—find flaws, risks, and market concerns.”
)
# Agent 3: Improver
agent3 = Agent(
system_prompt=“You are a product strategist. Improve the startup idea based on critique to make it more viable and exciting.”
)
# Step 1: Agent 1 generates a startup idea
idea = agent1(“Generate a new startup idea in the field of education technology.”)
print(“\n🧠 Agent 1 – Startup Idea:\n“, idea)
# Step 2: Agent 2 critiques the idea
critique = agent2(f“Here is the startup idea: {idea}\nCritique this idea and point out issues.”)
print(“\n🔍 Agent 2 – Critique:\n“, critique)
# Step 3: Agent 3 improves it
improved_idea = agent3(f“Original Idea: {idea}\nCritique: {critique}\nImprove the idea based on the critique.”)
print(“\n🛠️ Agent 3 – Improved Idea:\n“, improved_idea)
Run it:
python multi_agents.py
Result
🧼 Step 9: Fix Common Errors
If you get:
AttributeError: ‘Agent’ object has no attribute ‘run’
Clean up:
pip uninstall strands-agents strands_agents strands-agents-tools -y
pip cache purge
Install the latest SDK from GitHub:
pip install git+https://github.com/strands-agents/sdk-python.git
Confirm:
pip show strands-agents
🔁 How to Resume Work Later
The next time you want to run your agents again, follow these steps:
- Open PowerShell as Administrator
- Launch Ubuntu
wsl -d Ubuntu
- Navigate to your project
cd ~/strands-test
- Activate your virtual environment
source my-agent-env/bin/activate
- Run your agent
python agent1.py
- To view all your .py files created inside strands-test
ls *.py
📸 Screenshot attached
✅ Conclusion
Congrats! 🎉 You’ve just built a functional AI agent and a collaborative multi-agent workflow using the Strands SDK on Windows via Ubuntu (WSL). You’ve learned how to install, troubleshoot, and reuse your environment.
This is just the start. With Strands agents, you can simulate complex reasoning, planning, or even full autonomous task systems. So go ahead — build more agents, give them unique roles, and let them collaborate to solve your toughest problems!