


Deploying a full-stack web application requires efficient containerization and cloud orchestration. In this guide, I will walk you through the end-to-end deployment of an Angular frontend and a Node.js backend using Docker Desktop, AWS Elastic Container Registry (ECR), and AWS Elastic Container Service (ECS).
We’ll start by containerising both applications using Docker, pushing the images to AWS ECR, and finally deploying them on AWS ECS with the appropriate configurations.
By the end of this tutorial, you’ll have a fully operational Angular + Node.js application running on AWS infrastructure.
Install Docker Desktop, create an Angular and Node.js project.
Step 1: Set up Folder Structure
dockerProject/
│── backend/ # Node.js backend
│ ├── server.js # Your Node.js entry file
│ ├── package.json # Dependencies & scripts
├── .dockerignore # Backend dockerignore
│ ├── Dockerfile # Backend Dockerfile
│── dockerProject-frontend/ # Angular frontend
│ ├── src/ # Angular source files
│ ├── angular.json # Angular config
├── .dockerignore # Frontend dockerignore
│ ├── Dockerfile # Frontend Dockerfile
│── docker-compose.yml # Docker Compose for both frontend & backend
Step 2: Create Dockerfile for Node.js Backend
# Use Node.js image
FROM node:18-alpine
# Set working directory
WORKDIR /app
# Copy package.json and install dependencies
COPY package.json package-lock.json ./
RUN npm install
# Copy all backend files
COPY . .
# Expose backend port
EXPOSE 5000
# Start the backend server
CMD [“node”, “index.js”]
Step 3: Create Dockerfile for Angular Frontend
# Use Node.js image to build an Angular app
FROM node:18-alpine AS build
WORKDIR /app
# Copy package.json and install dependencies
COPY package.json package-lock.json ./
RUN npm install
# Copy all frontend files
COPY . .
# Build Angular app
RUN npm run build –prod
# Use Nginx to serve the built Angular app
FROM nginx: alpine
COPY –from=build /app/dist/your-angular-app-name /usr/share/nginx/html
EXPOSE 80
# Start Nginx
CMD [“nginx”, “-g”, “daemon off;”]
*** You need to replace your-angular-app-name with the actual output folder name generated inside the dist/ directory when you build your Angular project.
To get your-angular-app-name
Open a terminal inside your Angular frontend project (dockerProject-frontend).
- Run the build command:
ng build –configuration=production - Once the build completes, check inside the dist/ folder. Run:
dir dist/
- You will see a folder named something like:
dist/
├── my-angular-app
Here, my-angular-app is the output folder name.
Step 4: Create docker-compose.yml (To Run Both Containers Together)
services:
backend:
build: ./backend
ports:
– “5000:5000”
volumes:
– ./backend:/app
environment:
– NODE_ENV=production
frontend:
build: ./dockerProject-frontend
ports:
– “4200:80”
depends_on:
– backend
Step 4: Create .dockerignore Files
- Inside backend/, create a .dockerignore file and add:
node_modules
npm-debug.log
.env
- Inside dockerProject-frontend/, create a .dockerignore file and add:
node_modules
dist
npm-debug.log
Step 5: Build and Run Docker Containers
**Before this, make sure that your Docker Desktop is running
Run these commands inside dockerProject/ (where docker-compose.yml is located)
- Build the images:
docker-compose build
- Run the containers:
docker-compose up -d
- Check running containers:
docker ps

Now check in your Docker Desktop, images have been created.
To deploy your Angular frontend and Node.js backend using Amazon ECS (Elastic Container Service), follow these steps:
Step 1: Create an ECR Repository in AWS
![]()
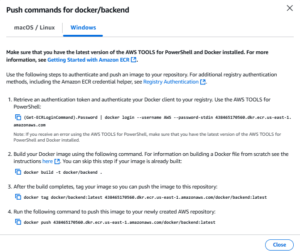
Step 2: Authenticate Docker with ECR
To do that, first install AWS TOOLS in your system using PowerShell by using the following commands.
** Open PowerShell as Administrator
PS C:\WINDOWS\system32> Install-Module -Name AWS.Tools.Installer -Force -Scope AllUsers
PS C:\WINDOWS\system32> Install-AWSToolsModule -Name AWS.Tools.ECR -Force
Installing module AWS.Tools.ECR version 4.1.772.0
PS C:\WINDOWS\system32> Install-AWSToolsModule -Name AWS.Tools.ECS -Force
Installing module AWS.Tools.ECS version 4.1.772.0
PS C:\WINDOWS\system32> Get-Module -ListAvailable AWS.Tools.*
![]()
PS C:\WINDOWS\system32> Set-AWSCredential -AccessKey <YOUR-ACCESS-KEY>-SecretKey <YOUR-SECRET-KEY>-StoreAs default
PS C:\WINDOWS\system32> (Get-ECRLoginCommand).Password | docker login –username AWS –password-stdin 438465170560.dkr.ecr.us-east-1.amazonaws.com (get this command from the ECR repo detail page by clicking “view push commands”)
Now that you have successfully logged in to Amazon ECR, you can push your Docker image to ECR. Follow these steps:
Step 1: Tag Your Docker Image
You need to tag your local Docker image with the Amazon ECR repository URL.
docker tag YOUR_LOCAL_IMAGE_NAME:YOUR_TAG 438465170560.dkr.ecr.us-east-1.amazonaws.com/YOUR_ECR_REPO_NAME:YOUR_TAG
*** Repeat this step for frontend and backend
Step 2: Push Your Image to ECR
After tagging, push the image to ECR using:
docker push 438465170560.dkr.ecr.us-east-1.amazonaws.com/YOUR_ECR_REPO_NAME:YOUR_TAG
*** Repeat this step for frontend and backend
Deploy using Amazon ECS
After pushing your Docker image to ECR, you can use it in Amazon ECS (Elastic Container Service) for deployment.
Step 1: Create an Amazon ECS Cluster
A cluster is where your containerised application will run.
- Go to AWS Console → Search for ECS (Elastic Container Service).
- Click on Clusters → Click Create Cluster.
- Choose “Networking only (AWS Fargate)” (Easiest for beginners).
- Click Next Step.
- Give it a name, e.g., my-cluster, and click Create.
- Wait for the cluster to be created, then click View Cluster.

Step 2: Create a Task Definition
A Task Definition tells ECS how to run your container.
- In ECS, go to Task Definitions → Click Create New Task Definition.
- Choose Fargate → Click Next Step.
- Give it a Task Definition Name (e.g., my-task).
- Under Task size, set:
- CPU: 0.5 vCPU
- Memory: 1 GB
- Scroll down to Container Definitions
- Enter:
- Container Name: my-container
- Image URL: Paste your Amazon ECR Image URL (e.g., 438465170560.dkr.ecr.us-east-1.amazonaws.com/my-ecr-repo:latest).
- Port Mappings: 80 (if your app runs on port 80).
- Click Add → Click Create.
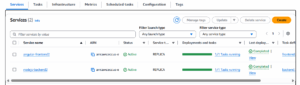
Step 3: Create a Service
The service makes sure your container runs continuously.
- Go to Clusters → Click on your cluster (my-cluster).
- Click Create → Choose Fargate.
- Under Task Definition, choose the one you just created (my-task).
- Under Service Name, enter my-service.
- Set Number of Tasks to 1.
- Click Next Step.
- In Networking, choose:
- Cluster VPC: Select the default one.
- Subnets: Select all available subnets.
- Security Group: Create a new one and allow HTTP (port 80).
- Click Next → Click Create Service.
Conclusion
Successfully deploying an Angular frontend and a Node.js backend using Docker, AWS ECR, and AWS ECS involves several key steps:
✅ Containerising both applications with Docker
✅ Pushing the images to AWS ECR
✅ Creating ECS task definitions for frontend and backend services
✅ Deploying services with correct networking and security configurations
✅ Troubleshooting deployment issues like the ECS circuit breaker
With this setup, you now have a scalable deployment model on AWS. You can further enhance it by integrating CI/CD pipelines, auto-scaling, and monitoring with CloudWatch.
I hope this guide helps developers streamline their deployments on AWS.