


Summery:
Upload a simple php application to Docker and then Upload that image ECR(Elastic Container Registry)Repository then we can deploy that image to ECS(Elastic Container Service) and run it on a Fargate Cluster.
The three AWS Services we are going to use: Elastic Container Service (ECS), Elastic Container Registry (ECR), and Fargate.
Elastic Container Registry (ECR) :
In the context of AWS (Amazon Web Services), ECR stands for Elastic Container Registry. It is a fully-managed Docker container registry service provided by AWS. ECR allows you to store, manage, and deploy Docker container images, which can be used to run applications and services in a containerized environment.
ECS(Elastic Container Service) :
ECS is a highly scalable, high-performance container management service that supports Docker containers and allows you to easily run applications on a managed cluster of Amazon Elastic Compute Cloud (Amazon EC2) instances.In simple way if we talk then ECS Manages the deployment of our application.
Fargate:
AWS Fargate is a serverless compute engine for containers provided by Amazon Web Services (AWS). It allows you to run containers without the need to manage the underlying infrastructure. Fargate abstracts away the infrastructure management and scaling aspects, enabling you to focus solely on deploying and running your applications.
Docker:
Docker is an open-source platform that allows you to automate the deployment, scaling, and management of applications using containerization. Containerization is a lightweight form of virtualization that enables you to package an application and its dependencies into a standardised unit called a container.
Let’s dive into the practical side of things right from the beginning.
Step1: Creating Dockerfile
FROM php:latest
COPY . /var/www/html
WORKDIR /var/www/html
CMD php -S 0.0.0.0:80
Step2: Create a simple php file with index.php
Hello, World!


Hello, World!
Step3: Install Docker
To install Docker Desktop and If you’re using up-to-date versions of Windows or Mac, install Docker Desktop once registraion done.
Step4: To deploy local app to Docker
Run the command in cli within your project directory
⦁ Create the Docker image:
docker build -t myapp
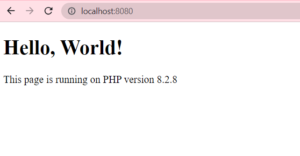
⦁ Test the app to make sure everything is working. The php app we will use the port 8000 to test.
docker run -d -p 8080:80 myapp
Now you should be able to go to localhost:8080 and see a deo text.
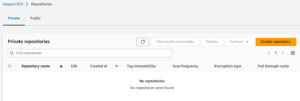
Step4: Create an ECR registry:
In this step we are going to create a repository in ECR to store our image. We will need the ARN (Amazon Resource Name — a unique identifier for all AWS resources) of this repository to properly tag and upload our demo content.
First login to the AWS console with your credentials we created earlier. Amazon will ask for your Email, and password.
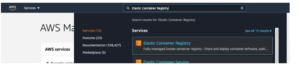
- Once you are in, search for the service Elastic Container Registry and select it.
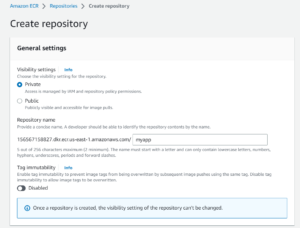
- After Going inside the ECR then just Click Create Repository and give the name anything you want and click Create Repository as below images.
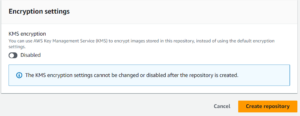
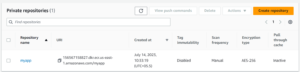
- After your Repository creation is successful then it looks like this.
Step5: Tag Image
In order for ECR to know which repository we are pushing our image to we must tag the image with that URI.Run the below command on your CLI.
docker tag myapp [use your ARN URL here]
- The full command for my ECR registry looks like this:
docker tag myapp 156567158827.dkr.ecr.us-east-1.amazonaws.com/myapp
⦁ Give the Docker CLI permission to access your Amazon account
I’ll admit this step is a little convoluted. We need to login to aws to get a key, that we pass to docker so it can upload our image to ECR.
- First we’ll login to our aws account.
aws configure
- Next, we need to generate an ECR login token for docker. This step is best combined with the following step but it’s good to take a deeper look to see what is going on. When you run the following command it spits out an ugly token. Docker needs that token to push to your repository.
aws ecr get-login-password --region us-east-1
- We can pipe that token straight into Docker like this. with your ARN. The ARN at the end is the same as the one we used earlier without the name of the repository at the end.
aws ecr get-login-password --region us-east-1 | docker login --username AWS --password-stdin [ARN Number].dkr.ecr.us-east-1.amazonaws.com
If all goes well the response will be Login Succeeded.
Step6: Upload your docker image to ECR:
- Use docker to push the image to the ECR repository.
docker push [your-arn-no].dkr.ecr.us-east-1.amazonaws.com/myapp
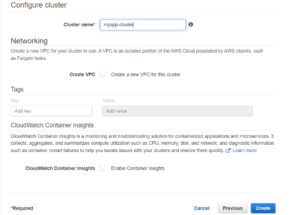
Step7: Create a Fargate Cluster:
Let’s return to the AWS management console for this step.
- Search for Elastic Container Service and select it.
- From the left menu select Clusters and select Create Cluster.
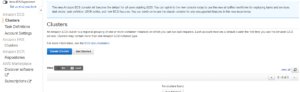
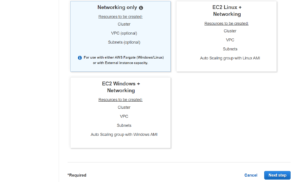
Then Click Next step give a name as you want to create a cluster and Select Create.
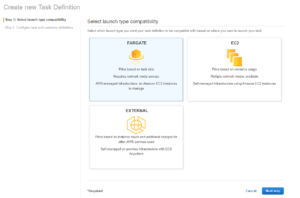
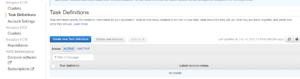
Step8: Create an ECS Task :
The ECS Task is the action that takes our php application and deploys it to a container.
To create an ECS Task let’s go to the ECS and do the following:
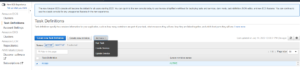
- Select Task Definition from the left side panel and click Create New Task Definition

- Then click Farget and choose Next Step
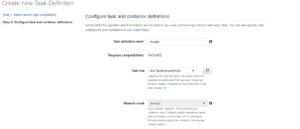
- Enter the you want to give your Task Name
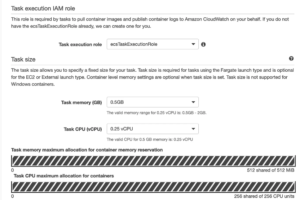
- You can Left Task Role otherwise it can automatically be created.
- For Task memory and Task CPU select the minimum values.
- Then Click Add Container
- Enter a Container name. I will use as per my cluster again.
- In the Image box enter the ARN of our ECR image. You can copy and paste this from the ECR dashboard.
- Youcan keep the Memory Limit to 128Mb
- In port mappings Whatever port we enter here will be opened on the instance and will map to the same port on the container. We will use 8080 because that is where our app listens. and simply click Add.
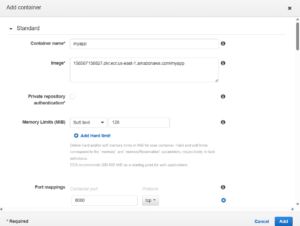
- Then you can click on Create
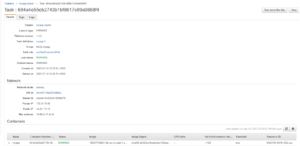
- Once your task is created successfully then it looks like this.
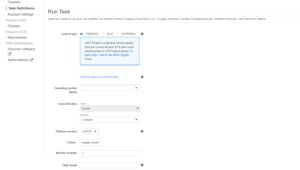
Step9: Run ECS Task
It’s time to rejoice, for the moment we’ve been waiting for is here.
- Choose Your Task on the task definition list Click Action and select Run task.
- Choose Lunch Type As: Fargate
- Make sure your Cluster As per you created on previous step
- Cluster VPC selects a VPC from the list. If you are building a custom app this should be the VPC assigned to any other AWS services you will need to access from your instance.
- Add at least one subnet from multiple options.
- Auto Assign public IP need Enabled.
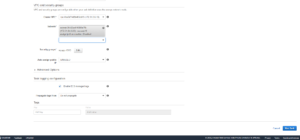
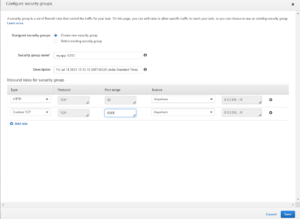
- Edit your security Group and click save
- Then click Run Task
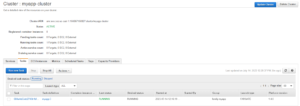
- To start your task it takes some time to run.
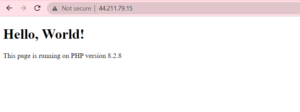
- After the task successfully run it looks like following:
- Open your preferred web browser and take Public IP as My [44.211.79.15].